Tuesday, December 29, 2015

Don't Block - Educate!

A student of mine is a teacher in a district that is SO restrictive regarding the online content that is blocked, that she described it this way: 
"Our school denies students (and TEACHERS) from Blogger, YouTube, Google Hangouts, limited Calendar abilities, and even a large portion of images are blocked."

This both broke my heart for her and her students, and angered me. This degree of restriction is both sad, and borderline educational malpractice.


Here is my position, and rationale for a different policy. 


If schools block YouTube, and most images when students are on school property, then they will have absolutely zero practice in how to handle staying on task in the midst of distracting, and even inappropriate, content online.
If we give them no guidance at all in how to navigate the reality they will live in, then they will be unequipped to function in the world once they leave us.

Online content and tools like YouTube, blogs, Google Hangouts, and images exist in the world outside of school.
Yes, there is a lot of garbage available online - from the harmless-but-distracting to the severely troubling. It should concern any adults that are in charge of 
They aren't going away any time soon. The online reality will only get more complex, not simpler.
The need for students to be educated in how to interact appropriately in that environment is not going to fade away - it's only going to increase.

These are simply statements of fact, whether we like it or not. We cannot change these realities.

It would be far better to train them to find appropriate videos and images for educational purposes, to hold them accountable for appropriate online behavior while they are under our authority and supervision. Then, they will be truly ready to function as an educated person in the world that exists outside of school.

On the other hand, I would advocate for a perhaps gradual lifting of restrictions as students progress up the grade levels. For example, my 4th graders don't have access to email, but high school students do. Also, I would suggest that an intermediate stage of change for a school district like this would be to allow teachers access to all of these tools (assuming that they are professional, trustworthy adults, that are perfectly capable of staying on task and appropriate in using the tools unfiltered). There should be no anxiety about teachers demonstrating the use of the tools. If district leadership can't handle going from almost total blocking to nearly zero blocking, they at least take this baby step toward more sane and responsible policies in this area.
Also, I'm not advocating having no blocking of images or websites at all. Some blocking/filtering software is appropriate.

Summary: Don't just block, and pretend that we have solved the problem, and wash our hands of the thorny issue of inappropriate online content.

This rant is officially over. For now. 

Thursday, October 15, 2015

Share a Google MyMap!

If location is important to a lesson or unit you are teaching, I encourage you to use a Google MyMap!

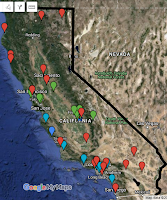
I did this today with California History with my 4th graders. For them to understand the importance of the different regions in California (Coast, Desert, Mountains, and Central Valley), they need to SEE it. We have a few small maps in our Social Studies workbook, but I knew that there had to be a better way...

What better way than to do it:
1. In the context of a shared, interactive map that they can zoom in and out of
2. By seeing actual satellite imagery, showing the different vegetation in each region
3. By placing a marker on the cities that are in each region
4. By coloring the markers to the appropriate, agreed-upon color (blue, red, yellow, and green)
5. By noticing when classmates make errors, and fixing them in real-time

I started with a Google Classroom assignment:
1. Find a city in each of the Regions of CA.(Desert, Mountains, Coast, Valley)2. "Add to Map"3. Change the color of that marker to match this Legend:Desert = redMountains = yellowCoast = blueValley = green4. Edit that marker by clicking on the little pencil icon - Add your name in the little box.
Once you have placed 4 markers, of cities in CA, and colored them appropriately, you may "Mark As Done".
Then I attached the link to the shared "MyMap".


I plan to add a layer to the map where we label the areas where the Native Americans (Native Californians) lived. This will be much more visual, interactive, and "in-context" than previous methods.


I learned what steps were harder for them - what parts of the process I might be slower and more explicit about next time. For example, in the screen shots below, you'll see that they had trouble changing the color of the marker to the appropriate color. This, of course, is a crucial aspect of demonstrating that they've learned about the regions, so I'll work on this more in the coming days. I had a couple students that were ignorant of state borders (that a certain nearby state was not, in fact, in CA). This might not have been corrected without a lesson like this.

Next time, maybe a little video showing each step, and more detail in the assignment itself will make the experience better for all.


Saturday, October 10, 2015

Every Kid In A Park - print free passes using Chromebooks and Classroom

I teach 4th grade, and my students are given the opportunity to sign up to get a free one-year pass to all National Parks. We got pretty excited about this when we had a Park Ranger visit our classroom this week.

I had them do this using their Chromebooks, but we don't have a printer set up to receive those print jobs.
I thought "Hmmm...I should be able to do this with the help of Google Classroom."
It worked!

Students navigated through the https://everykidinapark.gov/ website (steps #1-8),
then at step #9-12 below, created a PDF in their Google Drive.
Step #13-16 helps students choose a file from their Google Drive. That can be tricky for students that have only opened a Drive file directly from Classroom.

The following are the directions I used to guide the students through the process. I hope this is useful to you for this particular goal, or whenever you need to get a PDF created by a Chromebook to your teacher computer to be printed.

----------


Add files to a Google Classroom Assignment to “TURN IN”
“Your Free Pass”


  1. Click the link in this Google Assignment.
  2. Click “GET YOUR PASS”
  3. Click “PLAY” where it says “Fourth graders”
  4. You’ll see “Start your adventure now”. Click the little box that says “Yes…”. Click “PLAY”
  5. In the “Dear Diary” section of this website, explore what you want to learn about the National Parks.
  6. When you see “GET YOUR PASS NOW”, click it.
  7. You’ll see “You did it! Claim your pass”. Enter your zip code. It is 93618.
  8. Click “GET MY PASS”

  1. Click the green button that says “Click this button to PRINT YOUR PASS”
  2. Destination...Save as PDF… Click “Change…”
  3. At the bottom of the next screen, click “Save to Google Drive”.
  4. Click the blue button at the top that says “Save”

  1. In Google Classroom, open the “Your Free Pass” assignment
  2. On the Assignment, click “Add” (it has a little triangle next to it)
  3. Choose Google Drive
  4. Click the PDF that says “Your Free Pass”
  5. Click the blue button at the bottom that says “Add”
  6. You have now attached this file to the assignment, and it’s ready to Turn In.
  7. Click “TURN IN”

  1. Your teacher will print this for you. Take this paper to a National Park, and you will get in FREE for a year!

Thursday, September 17, 2015

Educational Promise of Voice Typing

Google recently made Voice Typing available for schools (Google Apps for Education accounts).

There are several ways that this can be used in with students.
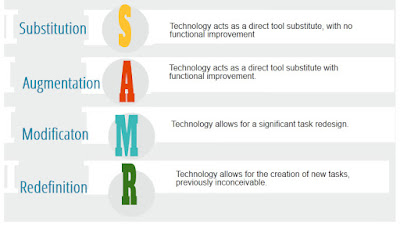
It's not just replacing (Substituting, see SAMR) pencil and paper or even typing.

I believe that there are some substantive, educational benefits to this feature that could really be a game-changer for many students that haven't been reached by other methods or tools. For these students, this could be Augmentation or even Modification.


There's not much to say about how to use it, but for those that may not be familiar, here's how it works:


1. In the Tools menu of Google Docs, you'll now see "Voice Typing".


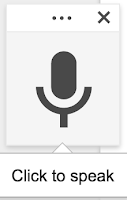
2. You'll then see a little window on the left with a microphone icon in it. Do as it says: "Click to speak".


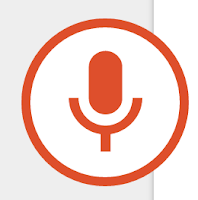
3. When you're speaking (and therefore typing), you'll see this red microphone icon.


Now for the educational benefits....

The Speaking and Listening standards in the CCSS can be addressed:
1. The quiet ones
I find that every year, I have several students that struggle with speaking loudly enough to be heard when speaking to the whole room.
2. Those that don't enunciate well enough to be understood
Others don't have a volume problem, but an enunciation problem.

This tool could give both of those kind of students practice working on their speaking.

The Writing standards are now (more) accessible for all students.
Many students have issues that prevent them from participating in anything beyond the earliest stages of the writing process:
3. Those with fine motor skills issues
Holding a pencil, or even typing, is a physical issue that makes the academic thinking of revising, improving, or correcting their written work nearly out of reach.

4. Those with profound difficulty with spelling
They can at least get their ideas out, and think about sentence structure, and deeper tasks such as revising and improving their work.

5. Those with more extensive needs for speech therapy
Depending on the accuracy of this tool, it might even help students realize, "Oh, that's what that sounds like when I say ____". Some students don't realize how they sound unless we record their voice and play it back to them. This tool could certainly play a part of helping those students.

It may now be possible for all students to excel even more with the Writing standards, and the Language standards
6. Those that struggle with focus (ADD-type issues)
Doodling, manipulating the paper, excessive erasing, etc.
I have witnessed how helpful voice typing is when using an iPad with a student with just these issues. Now even more students can access this solution to those struggles.

7. More writing, more thinking, more creating
If writing and typing take significantly less time, then even students without special needs or struggles can write more, think more, and create more, since this tool can speed up a rather mundane, time-consuming part of the process.

The naysayers...
There are certainly those that will respond with things like:
"But in the real world, they're still going to need to type."
"Yeah, but they still need to know how to write with a pencil."
or other similar criticisms.

My response is this:
How long are we going to protect a barrier for these students to do higher order thinking?
What's the point of continuing a prerequisite that prevents students from language-rich conversations about their own word choice, manipulating complex sentences?
Let's let them at least get their ideas out, on the digital page, so they can do some deeper, more critical thinking about their own work!

This is 2015. These types of tools and features are not going to go away. They're going to be more common, not less. They are going to get more and more ubiquitous. We might as well acknowledge that, as we grapple with tools that are just becoming available now.

Sure, they're going to have to use a pencil and a keyboard at some point. Must we wait until these overcome all their barriers before we allow them to learn the other parts of the writing process?

After all, we must prepare them for their future, not our past.


I very much welcome your thoughts. How else can you see this tool benefiting students? How else can we use it in the classroom? Please leave a comment!

Wednesday, August 19, 2015

Reset Class Code on Google Classroom

As you begin using Google Classroom, you will find that getting all your students to join the class might take more time than you anticipate. This tip might make it easier.

Google Classroom will have a code that you need to have your students all enter to join your class.
(You can Invite them all, but the class code is much easier.)

Displaying our Google Classroom home page, I zoom in on the part with the class code.


You can reset that code if you don't like the random one that you are given.
       Click the little triangle next to the class code, and you'll see "Reset" and "Disable".

I reset mine several times, to avoid the following:
1. The number zero and the letter O
2. The number 9 and the letter q
3. The number 1 and the lower case letter l, or the capital letter I
4. The number 5 and the letter s

Just not having these avoids confusion, especially on the part of younger, or less academically successful students.


Here is how Alice Keeler puts it:

Click on the arrow to the right of the class code and you have the option to reset the code. I keep choosing “Reset” until the code looks easy. I do not want any zeros, L’s, 5’s, o’s, 1’s since they can be confused for a different number or letter. Sometimes I luck out and the class code almost makes a word. Try resetting your class code until it is something you like. It is kinda fun to try out!

I know I may be a bit late to the Google Classroom party, but I haven't had as much access to hardware as I do this year, so as I learn new things, I will try to post them here, to help those that are also learning how to use Google Classroom.

Do you have any other tips, or things to avoid about the Class Code? Please leave them in the comments below!

Sunday, August 16, 2015

Sync Chrome Between Devices

Sick of emailing websites to yourself from your iPhone/iPad or Android device to your computer?

Just use the Chrome browser, and your tabs will Sync!
You'll have to set it up on your mobile device, and you need to know where to go on your computer's version of Chrome to find those tabs, but this page explains it all:
https://support.google.com/chrome/answer/2591582?hl=en


Here is how to get your iPhone and your laptop to play nice with each other:

  • On Chrome for iOS
    1. Touch Chrome Menu > Settings > your email address > Advanced.
    2. Slide the "Sync Everything" switch to On. If you don't want to sync everything, slide the switch to OFF and choose the data you want to sync, specifically "Open Tabs". Note: To disable tab syncing, slide the "Open Tabs" switch to Off.
Access Open Tabs on other devices
  1. Go to the Chrome menu Chrome menu .
  2. Click Recent Tabs.
  3. Click the tab you want to open from a device listed.


Wednesday, August 12, 2015

Lessons for Learning, from Lego (Movie)

This year, I'm using "The Lego Movie" as a theme in my classroom.

Sure I have a couple little posters I made that I think are pretty fun, but there are also profound messages that I hope will motivate and inspire my students.

Check out this page from my class website, where I have embedded some of the more poigniant clips.

Class Dojo Intro Presentation & Videos

Here is a Presentation that will walk you through what Class Dojo is, and what you can do with it.


This video does a great job explaining how Class Dojo can help you emphasize positive behaviors in your class.


Parents love Class Dojo, too! Watch this video to see how CDJ can help you communicate with parents.

Tuesday, August 11, 2015

Class Dojo in my Classroom

We use PBIS in my district, which stands for Positive Behavior Intervention and Supports.
This is a great movement that seeks to use more positive means to affect students' behavior than merely punitive/negative ones. Here's how I connect those behaviors to my Class Dojo behaviors.

PBIS?
The way this works is that a school generally comes up with some sort of acronym (often having to do with their mascot), and uses each letter to list a behavior, or category of behaviors, that we are looking for from students. For example, "Give Respect" is one of ours. Giving Respect will look different in the classroom, the cafeteria, and the playground. So, several different posters are developed to very specifically teach students exactly what Respect, Excellence, and so forth all look like in those different contexts.

Tie Class Dojo behaviors to your school's behavior expectations
I set up my Class Dojo so that I could tie in to those school-wide PBIS behaviors on a daily basis, rather than just having my own set of behaviors. It really didn't require much adjustment at all, actually.

PBIS "Eagle Expectations" for my school
First, here are our what we call our "Eagle Expectations" (our mascot is...you guessed it...the eagle!):

Eagerly Learn
Act Responsibly
Give Respect
Listen Attentively
Exhibit Excellence

My Positive Class Dojo behaviors
Here are my positive behaviors. In some cases, the phrase I use is one of the descriptors of one of the main behaviors. I put the letter E, A, G, L, or e in front of the behavior so I could easily, verbally tie it more explicitly to the specific school-wide expectation, if it seems necessary or appropriate.

E- Eager to Learn
     An attitude thing. "Participate" is one descriptor for this school-wide one. I also look for that.

A-On Task
I use this one a lot by telling the class what to do, and then randomly choosing a student. If they are doing what I asked, the whole class hears my phone go "ding!", and they know someone is getting a point! Sure beats nagging those that are not yet on task!

G-Respectful
    Very versatile. Fun to give this one out. Easy to find situations where this is appropriate.

L-Listen Attentively
     Sometimes it's a toss up between this one and "On Task".  If they're doing what they're supposed to, they obviously were listening in the first place. When a student is sitting quietly when those around them are talking & making noise, I make a big deal out of this one.

e-Excellence
     I weighted this one double, so that if I randomly call on someone, and they are not only prepared with an answer (On Task), but have a correct answer, I can give them a point, essentially, for both with one tap.
     I also made it a lower-case "e" to avoid confusion with "Eager to Learn".

Math Practice Standards:
Be ready to affirm them when these qualities show up in your classroom!
I also included several of the Standards for Mathematical Practice. These are qualities of a mathematical conversation that I wanted to be ready to affirm. The "Justify/Critique" one is a bit of a crossover - it's also useful for during a Language Arts conversation, and students are defending their answer, giving textual evidence for their observation, and such.

MP1-Perseverance
MP3-Justify/Critique
MP5-Tools
MP6-Precision
MP7-Structure
MP8-Patterns

My Negative Class Dojo behaviors
Here are the negative behaviors I use. In the case of Act Responsibly,  I needed more than one negative behavior to specify just how they were being irresponsible.

E-Not Trying

A-Irresponsible

A-Off Task

A-Unprepared

G-Disrespectful

L-Not Listening

e-Disobedient

No Glasses 
     I added this one so I would have a way to track when a student that had glasses, needed glasses, and didn't bring them. I didn't penalize students if they were broken, truly lost. However, if the glasses were lost, I might give them a very pointed, clear expectation for "homework": look for them with your parents. I had them write this down in their planner. Then, the next day, if they have no glasses, and they tell me that they didn't look, I would assign a negative point here.


Any thoughts or questions on this? Leave a comment!

Do you connect your PBIS school-wide behaviors with your Class Dojo behaviors? Leave a comment explaining how!


Class Dojo at Home

As we go back to school, many teachers are setting up our Class Dojo rosters and behaviors.
A few weeks ago, I was sharing with someone how I used Class Dojo at home this summer.

Every teacher who is also a parent doesn't "really" get summers off.
As I have found myself saying a lot in the last couple years, "Parenting Ain't for Wimps!"

So, here are the behaviors that I used this summer. They are basically the things that we were needing to work on, and remind our sons about. We didn't use the negative ones hardly at all. I don't use the negative ones much in class, either, actually. Class Dojo is a great tool for ME to remember to accentuate the positive.


Contentment
End Fun Time Well
Respectful Words
Manners
Pet Owner
Maturity
Helping Others
Teamwork
Work Hard
On Task

"Contentment" allowed us to compliment them when they could have whined, but didn't.
"End Fun Time Well" is when they had to turn off the TV, Wii, iPad, etc. This one always takes work!
"Compromise" is when they want something, but we can't do exactly what they want, but are able to move from our original position...and they accept that.
"Respectful Words" is exactly that. Sometimes, we were just blown away at how polite, kind, etc. they spoke. This gave us a way to celebrate that.
"Pet owner" was important when trying to help our boys participate in, rather than undermine, ways that we were trying to train our dog. Or, when they put forth some extra effort taking care of the dog.
"Maturity" is always a battle, right? This allowed us to affirm it when we saw it.

I assume the rest are pretty obvious.

After a few weeks of using it, a spontaneous conversation about these behaviors produced some Bible references that connect directly to some of the behaviors. We didn't over-do it with the verses. It was just a neat connection that just happened one day.

Friday, July 31, 2015

Google Sites, Blogger, and HTML

Someone was having a difficult time making a table in Blogger, and I thought of a way to do it without having to know all the HTML code. It involves using the features in Google Sites to make a table, looking at (and copying) the HTML version of the GSites page, and then going to Blogger, looking at the HTML version of a Page or a Post, then pasting in the HTML copied from Google Sites.

Here is my super-simple quick-and-dirty demo:


Saturday, July 25, 2015

Complete Message / Complete Apology

In the corner of my classroom, I have two small posters. One lists the parts of a Complete Message. The other lists the parts of a Complete Apology.

Early in the year, I thoroughly teach my class what each of these mean. Then, when there is a conflict between students, I am able to send them to that corner of the room for a bit of privacy and time, with these reminders of how to rebuild their relationship.

It has met with great success, and brings greater relational health to my classroom. It is also beginning to have an impact on the adults at my school site. 

Here is an explanation of both.

Complete Message
1. When you…

2. I felt…

3. I thought…

4. I need…

1. When you…
         This is a statement of fact. Describe the situation as impartially as possible. No judgements about motive, intentions, or hidden agendas.
If “Presuming Positive Intentions” may be difficult, but at least try to “Presume NEUTRAL Intentions”.

2. I felt…
3. I thought… (These could be in either order: “I thought”, then “I felt”)
         Own your own feelings and thoughts. No “you made me feel…”. Just a description of what you experienced. Since these thoughts and feelings occurred “when you…”, the suggestion is that the event played a large part in those thoughts and feelings.
         This stage might be tricky. “I felt that you…” might not be received well. You’ve lapsed into accusation at this point.

4. I need…
         Without this piece, the listener to this “complete message” might wonder, “What’s the point?” Perhaps you’ll need an apology, or some discussion about how things could be better next time. Perhaps there’s a way that things could be repaired. This step is where you describe what you think could help heal the relationship.


Complete Apology
1. I’m sorry…

2. That I…

3. because________.

4. Here’s how things will be different next time.

1. I’m sorry…
         Or, “sorry.” This is where we DON'T want students to stop. Adults don’t want to hear this word alone, either. By itself, this is pointless and without real meaning.

2. That I…
         Mention exactly what you did that caused hurt. It will be meaningful to hear you own your actions.
         Don’t say “I’m sorry that you felt hurt…” This might be perceived as avoiding responsibility, and will not be very meaningful.

3. because________.
         You need to mention why this was not OK for you to do. What’s wrong with what you did? This will be extremely meaningful to hear.

4. Here’s how things will be different next time.

         Most of the time, the person being apologized to needs to know that you won’t do it again. Here is an opportunity to explain what you will try to do differently next time.


Many thanks for teaching me about these ideas goes to:
Ron Claassen, from the Center for Peacemaking and Conflict Studies at Fresno Pacific University
and
Delores Friesen, PhD, Profesor Emerita of Pastoral Counseling at Fresno Pacific University

Thanks to Edutopia for stimulating the conversation, which prompted me to write this up as a blog post! 

Wednesday, July 22, 2015

Make screencasts with Screencastify!

Screencastify is a free Extension for the Chrome browser that allows you to make a screencast of your screen as you narrate. This is a marvelous tool to demonstrate for your students how to do an assignment, or for your colleagues how they might use something with their students.

Here are some resources on how to get started with Screencastify:

https://www.screencastify.com/

A good blog post that walks through how to use it

A good YouTube video walking through how it works

Click here to go to the Chrome web store to install the Extension right away...


Screencast videos you create reside on YouTube, or on your Google Drive. You can embed them into a Google Site, a Blogger blog post, or any other web page you have access to to embed things!

Friday, July 17, 2015

Embed YouTube videos into Blogger

To embed something in your Blogger blog or Google Site, it is basically the same process. I'll explain how to embed a YouTube video here, and you can adapt this to embedding other things.


1. Click "Share"
1. Go to a YouTube video page, and click the "Share" button (which looks like a Greater Than symbol, and is near the "+Add To")


2. Click "Embed"
2. You will now see three options: Share, Embed, and Email. Share is selected by default, which shows you a simple URL. This will allow you to just allow someone to click and see the video on YouTube. This is not what you want. Click on the word "Embed", and you will see the embed code, which is HTML code.


3. Copy this HTML code to your clipboard.


3. Copy this HTML code to your clipboard.


Steps 1-3 may look a bit different, depending on the site you get your embed code from.


4. Now, in Blogger, begin a now blog post.


5. Click HTML
5. In the top-left area of the screen,
you'll see Compose and HTML. Click HTML.


6. You'll now see the way that blog post looks in raw HTML code. Since it's blank at this point, it will only look like this:


7. Paste the embed code you got from YouTube (Step 3, above) in that window somewhere. It will be easy to move it later, if you don't choose exactly the right place.

8. Click back to "Compose", and you should see your video will be.
        If you're using Google Sites instead of Blogger, you will see a rectangle where your video will be. You need to click "Save" to see the actual video.

9. I suggest adding a bit of text just before your video, to explain to your audience what they're about to see. This way, they will perhaps be persuaded to actually click on, and view, the video. Entice them to spend the time necessary to watch the whole thing, etc.

Below is what your blog article might look like, if you were introducing this YouTube video:
----------------------------------------------------------------------------------------------------

You may wonder how to embed things into Blogger. Here is a great video I found on YouTube that you might find useful.

Tuesday, July 14, 2015

Let's Go Diigo!

Why use Diigo?

Curate resources you find. If you're like me, especially when using Twitter, you may find it hard to keep all the resources that you're finding organized. I'm afraid I'll lose track of a dynamite resource. I can't exactly bookmark a tweet...the stream keeps flowing!


What is your favorite way to use Diigo?
There are several ways to set up your desktop, laptop, or mobile device to optimize your use of Diigo. Look at the list here, and see what looks good.

Here are a few suggestions from that link to get started. Please leave a comment regarding which you have tried, and which are your favorites.
Diigo Chrome Extension
https://www.diigo.com/tools/save_tweets
https://www.diigo.com/tools/tagroll
https://www.diigo.com/blog_this/config
https://www.diigo.com/tools/diigolet


And one more idea or reason to care...
Embed your own Diigo feed on your website
You can let your PLN know what resources you have put together. You don't have to tweet out each one, especially if you found them a while ago.


Rubik's Cube Instructions in JavaScript

Can Rubik's Cubes fit in Computer Science or Math?  I say YES! Read on to find out why. This past summer, I learned how to solve several...