Wednesday, July 13, 2016

Add Gadgets to Blogger

You are at the beginning stages of creating a blog using Blogger.
You know how to write a blog post.

Now it's time to add other content along the sides of your blog. These are called gadgets.

1. Go to Layout.
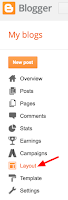


2. Choose a size for your Sidebar gadget.

They can be different sizes. You may want to choose one that fills the entire margin, or just half of the margin. I have already added some gadgets, which you can see on this blog.


3. Add a Sidebar gadget.
Here are some suggestions for gadgets you might want to add:

•HTML/Javascript - This is great for embedding your Twitter tweets, or any other HTML embed code you might want to put on your blog.

•Profile - Great for letting people know who you are (and show them why you should keep reading your blog).

•Labels - Give them easy access to the labels that you categorize your blog posts with.

•Link List or Blog List - Here is where you show your blog readers what blogs you read. What influences and inspires you? Where can they go for more great content?

•Translate - If your audience is multi-lingual, this one would be great for you.

When you have posted a lot of content, these two would be important to have:
•Search Box - They should be able to search your blog

•Popular Posts - Promote your most popular blog posts


4. Re-arrange your gadgets.


Click and hold on the vertical dots, and drag your gadgets around.


5. Lather-Rinse-Repeat (Revise)
Maybe now you realize that you chose the wrong size for the gadget that you chose. Go back and re-add the gadget with the size you prefer.

Thursday, April 21, 2016

Peer Commenters

I had an epiphany today.

I’ve been commenting like the wind lately, giving feedback on my students’ writing. I’ve been saying academic, but somewhat cryptic things like “cap…”, which means they have a capitalization error. Or “verb tense”, or “proper noun”, etc.

They are finally mature and independent enough that we can do more independent writing time, with more and more feedback given.
Also, several of my students are ready to be peer commenters. They are proficient enough that I would trust their comments (at least enough to risk it at this point).

Today, we came up with a list of comments that I’ve been giving them, others that I could give them, and what they mean. We were also intending for the Peer Commenters to use these same comments.
I knew we had to be structured like this because I wanted to avoid meaningless wastes to time like “this is cool” or “good job” or especially “this duznt mak sens” or even more disrespectful things.
I want the comments to be worth our time, helpful to the original author, and a good example of digital citizenship.

I have extremely high hopes for this structure, and how it will help my students’ writing. I just wish I had been able to start this months ago!

I’m sure these documents will be dynamic, as this becomes more and more a part of how we function as a class…

Here is my list of Peer Commenters:

Here is my Comments Key:

FYI: The URL for this blog (edwardwarkentin.com) used to be https://ededtech.blogspot.com/

Follow me on Twitter: https://twitter.com/senorw and

Facebook: https://www.facebook.com/warkentin.ed

Tuesday, December 29, 2015

Don't Block - Educate!

A student of mine is a teacher in a district that is SO restrictive regarding the online content that is blocked, that she described it this way: 
"Our school denies students (and TEACHERS) from Blogger, YouTube, Google Hangouts, limited Calendar abilities, and even a large portion of images are blocked."

This both broke my heart for her and her students, and angered me. This degree of restriction is both sad, and borderline educational malpractice.


Here is my position, and rationale for a different policy. 


If schools block YouTube, and most images when students are on school property, then they will have absolutely zero practice in how to handle staying on task in the midst of distracting, and even inappropriate, content online.
If we give them no guidance at all in how to navigate the reality they will live in, then they will be unequipped to function in the world once they leave us.

Online content and tools like YouTube, blogs, Google Hangouts, and images exist in the world outside of school.
Yes, there is a lot of garbage available online - from the harmless-but-distracting to the severely troubling. It should concern any adults that are in charge of 
They aren't going away any time soon. The online reality will only get more complex, not simpler.
The need for students to be educated in how to interact appropriately in that environment is not going to fade away - it's only going to increase.

These are simply statements of fact, whether we like it or not. We cannot change these realities.

It would be far better to train them to find appropriate videos and images for educational purposes, to hold them accountable for appropriate online behavior while they are under our authority and supervision. Then, they will be truly ready to function as an educated person in the world that exists outside of school.

On the other hand, I would advocate for a perhaps gradual lifting of restrictions as students progress up the grade levels. For example, my 4th graders don't have access to email, but high school students do. Also, I would suggest that an intermediate stage of change for a school district like this would be to allow teachers access to all of these tools (assuming that they are professional, trustworthy adults, that are perfectly capable of staying on task and appropriate in using the tools unfiltered). There should be no anxiety about teachers demonstrating the use of the tools. If district leadership can't handle going from almost total blocking to nearly zero blocking, they at least take this baby step toward more sane and responsible policies in this area.
Also, I'm not advocating having no blocking of images or websites at all. Some blocking/filtering software is appropriate.

Summary: Don't just block, and pretend that we have solved the problem, and wash our hands of the thorny issue of inappropriate online content.

This rant is officially over. For now. 

Thursday, October 15, 2015

Share a Google MyMap!

If location is important to a lesson or unit you are teaching, I encourage you to use a Google MyMap!

I did this today with California History with my 4th graders. For them to understand the importance of the different regions in California (Coast, Desert, Mountains, and Central Valley), they need to SEE it. We have a few small maps in our Social Studies workbook, but I knew that there had to be a better way...

What better way than to do it:
1. In the context of a shared, interactive map that they can zoom in and out of
2. By seeing actual satellite imagery, showing the different vegetation in each region
3. By placing a marker on the cities that are in each region
4. By coloring the markers to the appropriate, agreed-upon color (blue, red, yellow, and green)
5. By noticing when classmates make errors, and fixing them in real-time

I started with a Google Classroom assignment:
1. Find a city in each of the Regions of CA.(Desert, Mountains, Coast, Valley)2. "Add to Map"3. Change the color of that marker to match this Legend:Desert = redMountains = yellowCoast = blueValley = green4. Edit that marker by clicking on the little pencil icon - Add your name in the little box.
Once you have placed 4 markers, of cities in CA, and colored them appropriately, you may "Mark As Done".
Then I attached the link to the shared "MyMap".


I plan to add a layer to the map where we label the areas where the Native Americans (Native Californians) lived. This will be much more visual, interactive, and "in-context" than previous methods.


I learned what steps were harder for them - what parts of the process I might be slower and more explicit about next time. For example, in the screen shots below, you'll see that they had trouble changing the color of the marker to the appropriate color. This, of course, is a crucial aspect of demonstrating that they've learned about the regions, so I'll work on this more in the coming days. I had a couple students that were ignorant of state borders (that a certain nearby state was not, in fact, in CA). This might not have been corrected without a lesson like this.

Next time, maybe a little video showing each step, and more detail in the assignment itself will make the experience better for all.


Saturday, October 10, 2015

Every Kid In A Park - print free passes using Chromebooks and Classroom

I teach 4th grade, and my students are given the opportunity to sign up to get a free one-year pass to all National Parks. We got pretty excited about this when we had a Park Ranger visit our classroom this week.

I had them do this using their Chromebooks, but we don't have a printer set up to receive those print jobs.
I thought "Hmmm...I should be able to do this with the help of Google Classroom."
It worked!

Students navigated through the https://everykidinapark.gov/ website (steps #1-8),
then at step #9-12 below, created a PDF in their Google Drive.
Step #13-16 helps students choose a file from their Google Drive. That can be tricky for students that have only opened a Drive file directly from Classroom.

The following are the directions I used to guide the students through the process. I hope this is useful to you for this particular goal, or whenever you need to get a PDF created by a Chromebook to your teacher computer to be printed.

----------


Add files to a Google Classroom Assignment to “TURN IN”
“Your Free Pass”


  1. Click the link in this Google Assignment.
  2. Click “GET YOUR PASS”
  3. Click “PLAY” where it says “Fourth graders”
  4. You’ll see “Start your adventure now”. Click the little box that says “Yes…”. Click “PLAY”
  5. In the “Dear Diary” section of this website, explore what you want to learn about the National Parks.
  6. When you see “GET YOUR PASS NOW”, click it.
  7. You’ll see “You did it! Claim your pass”. Enter your zip code. It is 93618.
  8. Click “GET MY PASS”

  1. Click the green button that says “Click this button to PRINT YOUR PASS”
  2. Destination...Save as PDF… Click “Change…”
  3. At the bottom of the next screen, click “Save to Google Drive”.
  4. Click the blue button at the top that says “Save”

  1. In Google Classroom, open the “Your Free Pass” assignment
  2. On the Assignment, click “Add” (it has a little triangle next to it)
  3. Choose Google Drive
  4. Click the PDF that says “Your Free Pass”
  5. Click the blue button at the bottom that says “Add”
  6. You have now attached this file to the assignment, and it’s ready to Turn In.
  7. Click “TURN IN”

  1. Your teacher will print this for you. Take this paper to a National Park, and you will get in FREE for a year!

Thursday, September 17, 2015

Educational Promise of Voice Typing

Google recently made Voice Typing available for schools (Google Apps for Education accounts).

There are several ways that this can be used in with students.
It's not just replacing (Substituting, see SAMR) pencil and paper or even typing.

I believe that there are some substantive, educational benefits to this feature that could really be a game-changer for many students that haven't been reached by other methods or tools. For these students, this could be Augmentation or even Modification.


There's not much to say about how to use it, but for those that may not be familiar, here's how it works:


1. In the Tools menu of Google Docs, you'll now see "Voice Typing".


2. You'll then see a little window on the left with a microphone icon in it. Do as it says: "Click to speak".


3. When you're speaking (and therefore typing), you'll see this red microphone icon.


Now for the educational benefits....

The Speaking and Listening standards in the CCSS can be addressed:
1. The quiet ones
I find that every year, I have several students that struggle with speaking loudly enough to be heard when speaking to the whole room.
2. Those that don't enunciate well enough to be understood
Others don't have a volume problem, but an enunciation problem.

This tool could give both of those kind of students practice working on their speaking.

The Writing standards are now (more) accessible for all students.
Many students have issues that prevent them from participating in anything beyond the earliest stages of the writing process:
3. Those with fine motor skills issues
Holding a pencil, or even typing, is a physical issue that makes the academic thinking of revising, improving, or correcting their written work nearly out of reach.

4. Those with profound difficulty with spelling
They can at least get their ideas out, and think about sentence structure, and deeper tasks such as revising and improving their work.

5. Those with more extensive needs for speech therapy
Depending on the accuracy of this tool, it might even help students realize, "Oh, that's what that sounds like when I say ____". Some students don't realize how they sound unless we record their voice and play it back to them. This tool could certainly play a part of helping those students.

It may now be possible for all students to excel even more with the Writing standards, and the Language standards
6. Those that struggle with focus (ADD-type issues)
Doodling, manipulating the paper, excessive erasing, etc.
I have witnessed how helpful voice typing is when using an iPad with a student with just these issues. Now even more students can access this solution to those struggles.

7. More writing, more thinking, more creating
If writing and typing take significantly less time, then even students without special needs or struggles can write more, think more, and create more, since this tool can speed up a rather mundane, time-consuming part of the process.

The naysayers...
There are certainly those that will respond with things like:
"But in the real world, they're still going to need to type."
"Yeah, but they still need to know how to write with a pencil."
or other similar criticisms.

My response is this:
How long are we going to protect a barrier for these students to do higher order thinking?
What's the point of continuing a prerequisite that prevents students from language-rich conversations about their own word choice, manipulating complex sentences?
Let's let them at least get their ideas out, on the digital page, so they can do some deeper, more critical thinking about their own work!

This is 2015. These types of tools and features are not going to go away. They're going to be more common, not less. They are going to get more and more ubiquitous. We might as well acknowledge that, as we grapple with tools that are just becoming available now.

Sure, they're going to have to use a pencil and a keyboard at some point. Must we wait until these overcome all their barriers before we allow them to learn the other parts of the writing process?

After all, we must prepare them for their future, not our past.


I very much welcome your thoughts. How else can you see this tool benefiting students? How else can we use it in the classroom? Please leave a comment!

Wednesday, August 19, 2015

Reset Class Code on Google Classroom

As you begin using Google Classroom, you will find that getting all your students to join the class might take more time than you anticipate. This tip might make it easier.

Google Classroom will have a code that you need to have your students all enter to join your class.
(You can Invite them all, but the class code is much easier.)

Displaying our Google Classroom home page, I zoom in on the part with the class code.


You can reset that code if you don't like the random one that you are given.
       Click the little triangle next to the class code, and you'll see "Reset" and "Disable".

I reset mine several times, to avoid the following:
1. The number zero and the letter O
2. The number 9 and the letter q
3. The number 1 and the lower case letter l, or the capital letter I
4. The number 5 and the letter s

Just not having these avoids confusion, especially on the part of younger, or less academically successful students.


Here is how Alice Keeler puts it:

Click on the arrow to the right of the class code and you have the option to reset the code. I keep choosing “Reset” until the code looks easy. I do not want any zeros, L’s, 5’s, o’s, 1’s since they can be confused for a different number or letter. Sometimes I luck out and the class code almost makes a word. Try resetting your class code until it is something you like. It is kinda fun to try out!

I know I may be a bit late to the Google Classroom party, but I haven't had as much access to hardware as I do this year, so as I learn new things, I will try to post them here, to help those that are also learning how to use Google Classroom.

Do you have any other tips, or things to avoid about the Class Code? Please leave them in the comments below!

Rubik's Cube Instructions in JavaScript

Can Rubik's Cubes fit in Computer Science or Math?  I say YES! Read on to find out why. This past summer, I learned how to solve several...