Saturday, October 9, 2021

Rubik's Cube Instructions in JavaScript


Can Rubik's Cubes fit in Computer Science or Math? 

I say YES! Read on to find out why.

This past summer, I learned how to solve several versions of the Rubik's Cube. It is almost always advisable to start with the standard 3x3 cube. Most of the other versions (4x4, 5x5, Windmill, Mirror, etc.) are based on moves in the basic 3x3 instructions.


So I started with the 3x3. As I watched YouTube videos and wrote detailed instructions to prepare myself to teach this to my High School students, I couldn't help but think in terms of: 

  • Loops
  • Functions
  • Functions within Functions
  • Conditionals, and
  • APIs

Function / API:

In the above video and steps, you'll see a very frequently used set of moves, which this video calls 
"Right Hand":
JavaScript shown in block style
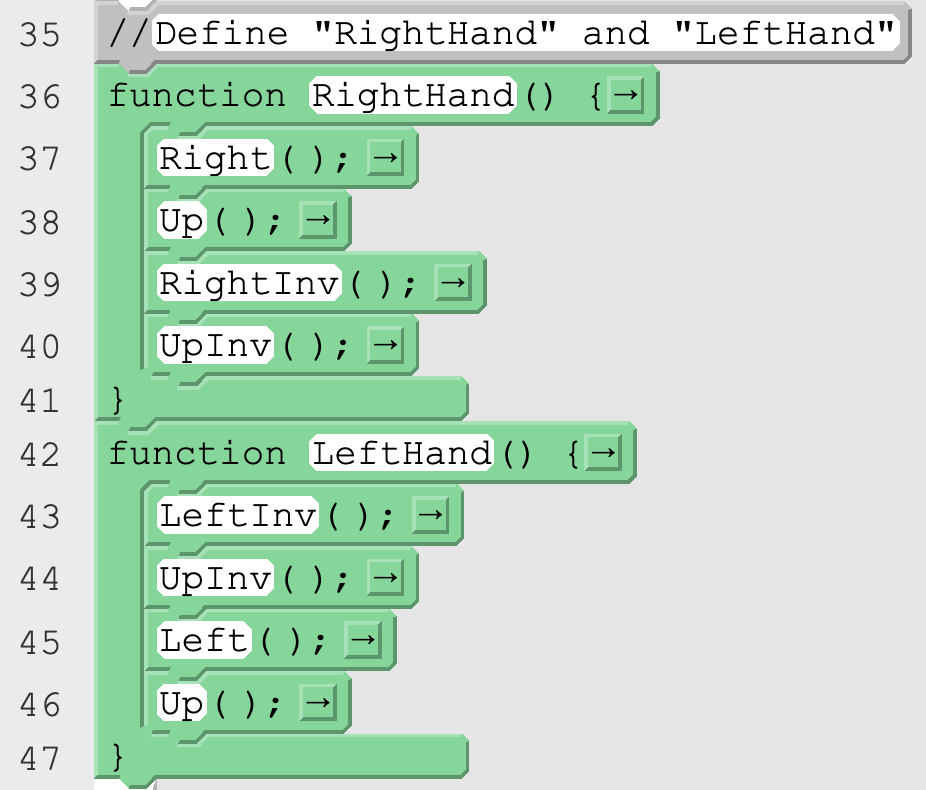
    1. Turn the right side clockwise
    2. Turn the top layer clockwise
    3. Turn the right side counter-clockwise
    4. Turn the top layer counter-clockwise 
The exact opposite, slightly less frequently used, set of moves, is called 
"Left Hand":
    1. Turn the left side counter-clockwise
    2. Turn the top layer counter-clockwise
    3. Turn the left side clockwise
    4. Turn the top layer clockwise


In the rest of the video/instructions,  "Right Hand" and "Left Hand" are referred to over and over without having to list the 4 steps that make them up every time.

From a Computer Science perspective, we have just added a Function to the API.

API:

Before this, a "cube-student" needs to learn the basic "commands", like:
R =  Turn the right side clockwise
R' = Turn the right side counter-clockwise
L = Turn the left side clockwise
L' = Turn the left side counter-clockwise
U and U' = The same pattern, with the top layer
F and F' = The same pattern, with the front face
D and D' = The same pattern, with the bottom layer
B and B' = The same pattern, with the back face

Conditionals:

As you go through the instructions, you'll get to a point where you need to do "Right Hand" UNTIL a certain condition is met (putting a corner that's on the top layer directly down to the bottom layer). 

Loops:

At a later part of the instructions, you'll need to do "Right Hand" THREE TIMES, turn the entire cube, then "Left Hand" THREE TIMES.


When you get to the very last step/phase, you'll do 
"Right Hand" ONCE
"Left Hand" ONCE
"Right Hand" 5x
"Left Hand" 5x


I used Code.org's App Lap to write a JavaScript version of the instructions & video mentioned earlier.
  • I made some Functions.
  • I made some For Loops to repeat a set of steps.
  • I needed to include more Comments where I had to stick with human-readable instructions. These were primarily for parts that were more intuitive, as opposed to an algorithm.
  • Math: I assumed that something like the following would be sufficient to evaluate whether one side of a piece did NOT match the desired color:  ((BottomOfCornerPiece != Yellow))

Parts of the "block" version of the code are shown above.

Here is the complete JavaScript project, shown in Text version:


//Define Basic Moves
//Right is often refered to as R
function Right() {
  TurnRightSideCLOCKWISE
}
//RightInv is often refered to as R'
function RightInv() {
  TurnRightSideCOUNTERCLOCKWISE
}
//Left is often refered to as L
function Left() {
  TurnLeftSideCLOCKWISE
}
//LeftInv is often refered to as L'
function LeftInv() {
  TurnLeftSideCOUNTERCLOCKWISE
}
//Up is often refered to as U
function Up() {
  TurnTopLayerCLOCKWISE
}
//UpInv is often refered to as U'
function UpInv() {
  TurnTopLayerCOUNTERCLOCKWISE
}
//Front is often refered to as F
function Front() {
  TurnFrontFaceCLOCKWISE
}
// FrontInv is often refered to as F'
function FrontInv() {
  TurnFrontFaceCOUNTERCLOCKWISE
}

//Define "RightHand" and "LeftHand"
function RightHand() {
  Right();
  Up();
  RightInv();
  UpInv();
}
function LeftHand() {
  LeftInv();
  UpInv();
  Left();
  Up();
}

function Bottom2Layers() {
  TurnBottomTwoLayersEitherDirection
}
function TurnCubeLeft() {
  TurnEntireCubeToTheLeft
}
function TurnCubeRight() {
  TurnEntireCubeToTheRight
}
function OrientCube(color) {
  OrientCubeSoThisColorIsOnTop
}

//WHITE CROSS
//Make "Daisy"(yellow center w/ white edges); Then continue:
//This "for" loop repeats its contents 4x
for (var i = 0; i < 4; i++) {
if (FrontFaceTopEdge_matches_FrontFaceCenter) {
  Right();
  Right();
  RotateCubeLeft
} else {
  Bottom2Layers();
}
//Goal is to have all white edges' other color to match centers.
}


//WHITE CORNERS in place
OrientCube(yellow);
while (LessThanFourWhiteCornersInPlace) {
  RotateTop: CornerWithWhite=AboveFinalPlace
while (WhiteSquareNotInPlace) {
  RightHand();
}
//If a white square is on the bottom, but in the wrong place, 
//Do these steps to move it to the top, then
//Repeat these steps to put it where it goes.
}

//COMPLETE MIDDLE LAYER (EDGES)
while ((TopEdgePiecesWithYellow < 4)) {
  // Turn U so Top Edge piece WITHOUT yellow faces you 
  while ((TopEdgePiece != FrontFaceCenter)) {
    Bottom2Layers();
  }
  //Top Edge piece should now match front face's center
  if (TopEdgePieceTopColor == RightFaceCenter) {
    Up();
    RightHand();
    TurnCubeLeft();
    LeftHand();
  } else {
    //Top Edge Piece's top color should match LEFT face center
    UpInv();
    LeftHand();
    TurnCubeRight();
    RightHand();
  }
}

//Orient Cube so Yellow is on bottom
OrientCube(white);

//YELLOW CROSS
while (NoYellowCrossYet) {
if (HorizontalYellowLine) {
  //Position yellows to the left and right
  //(NOT up and down)
  Front();
  RightHand();
  FrontInv();
} else if (NineOClockPattern) {
  //Position yellows in top and left
  Front();
  RightHand();
  FrontInv();
} else {
  //Only yellow center
  Front();
  RightHand();
  FrontInv();
}
}

//POSITION Yellow Corners
//These "for" loops repeats their contents 3x
OrientCube(yellow);
//Up until 2 adjacent corners are in proper position
//Put these 2 correct corners to the left
//These steps will swap the right two corners
for (var i = 0; i < 3; i++) {
  RightHand();
}
RotateCubeLeft();
for (var i = 0; i < 3; i++) {
  LeftHand();
}

//ORIENT Yellow Corners
OrientCube(white);
while ((NumberOfYellowCornersFacingDown < 4)) {
  while ((BottomOfCornerPiece != Yellow)) {
    //This should position the bottom-right piece so that
    //yellow is NOT on the bottom, but on one of the sides
    Bottom();
  }
  while ((BottomOfCornerPiece != Yellow)) {
    RightHand();
  }
}


//LAST STEP - position top edges
//This will rotate top edge pieces
while (CubeNotSolved) {
RightHand();
LeftHand();
//These "for" loops repeat their contents 5x
for (var i = 0; i < 5; i++) {
  RightHand();
}
for (var i = 0; i < 5; i++) {
  LeftHand();
}
}


Wednesday, August 5, 2020

Google Likes Breakfast!


When teaching students how to use Google products, we find ourselves needing to refer to these images:


 (This one's in the top-right of most Google products.)


(This one's on the Chrome browser's Bookmarks Bar.)


So what should we call them?
  • App Launcher? (the official name)
  • 3x3 grid? (what I've been calling them)
  • 9 squares? (fairly straightforward)
  • Rubik's cube? (pretty cute, I must say...)
Or, the emerging favorite...
  • Waffle!

The same situation exists with the 3 horizontal lines that are at the top-left of many Google products.
Going with the breakfast theme, it seems logical to call them...

  • Pancakes! (some call them a hamburger)


Therefore, I hereby declare that when I teach about, or talk about, these images, I will refer to them as "waffle", "colored waffle", and "pancakes".

Or at least I will try to. If others don't know what I'm talking about...well, some of the other options above work, too.
Waffles and pancakes make me smile, though.

Sunday, March 29, 2020

Physical Touch - #Reset2020

Touch: We don't know what we have 'till it's gone

Perhaps you are the type that loves to hug, shake hands, and such. Perhaps you're a bit more stand-off-ish. During this time of "social distancing" and a dramatic decrease of physical touch, I'm willing to bet that we all beginning to long to touch someone without anxiety of spreading sickness.
There are several reasons that touch is important to our mental health, our relational health, and even our spiritual health.

A. Touch is one of the "Five Love Languages"
Check out the link above for more details, but here's a summary of the concept.
We all feel love most significantly through one or more of these "languages":


This is a classic book about marriage and relationships. It's one of my most-recommended books. 
Order the book on Amazon (and thank God for all those helping to deliver everything that we all are ordering online, like those that work for the US Postal Service, UPS, Amazon, etc.)


B. Touch is part of "The Blessing"

  • Meaningful and appropriate touch (here's the section about touch)
  • A spoken message of love and acceptance
  • Attaching “high value” to the person being blessed
  • Picturing a special future for that person
  • An active commitment to fulfill the blessing

The main context that the authors of this book discuss "The Blessing" is from parent to child, but they describe many other contexts in which The Blessing applies.

Order the book on Amazon (and thank God for whoever delivers it to you)

C. Jesus used physical touch to heal people, which He could have just spoken words to heal them.

  • A woman knew that just touching His robe would heal her. Jesus felt power go out of Him when the touch occurred. Jesus did not scold her for the touch... Luke 8:43-46, and parallel passages
  • He he brought a dead girl back to life, and "took her by the hand" to help her stand up. Luke 8:53-55
  • He healed blind men by touching them. Matthew 20:32-34
  • He healed a man whose "skin was covered with leprosy" Luke 5:12-13  

Even for those that aren't usually very "touchy", I'll bet that you are starting to really miss being able to shake someone's hand, or hug someone (that you aren't quarantined with).

Like many things, we tend to not really know what we've got 'till it's gone. We don't appreciate the blessings that we've been given until we have to live without them. Today, I'm thinking about physical touch, prompted by a sermon by PJ Lewis at The Well-Kingsburg.

I predict that we as a society will explicitly value things that we are prevented from doing during this time of quarantine...including, or maybe especially...

physical touch.


Wednesday, March 18, 2020

God's Promises Bring us Peace and Stability

I recently went through an incredibly difficult time in my life. Anyone that I tell the story to is kind of amazed about how painful it must have been... What might be more surprising is that when the storm kind of died down, I was actually glad that it happened. Here are the main reasons that I'm glad.

I was already questioning and searching for promises from Scripture that I could really grab on to, and have a deeper confidence in than ever before. Trials make us dig deeper to find resources that we don't focus on very much otherwise, and this was where I knew I needed to dig.

When I was at nearly my darkest days, God gave me 3 promises that I could really cling to in the storm. Then, a bit later, He gave me a 4th. Here are the 4 promises that are now tremendously meaningful to me:

My 4 favorite promises for times of suffering

1. God loves me and cares about me“For God so loved the world…” John 3:16
“For I am convinced...” ‭‭Romans‬ ‭8:38-39‬
“Cast all your anxiety on him because he cares for you.” 1 Peter‬ ‭5:7‬

2. God will never leave meAnd be sure of this: I am with you always, even to the end of the age.”  Matthew‬ ‭28:20‬
“And I will ask the Father, and he will give you another Advocate, who will never leave you.”
‭‭John‬ ‭14:16‬ ‭NLT‬‬

3. In this world, I will have trouble, but true peace comes from Him“I have told you these things, so that in me you may have peace. In this world you will have trouble. But take heart! I have overcome the world.” ‭‭John‬ ‭16:33‬

4. Jesus understands, even when no one else understands“For we do not have a high priest who is unable to empathize with our weaknesses, but we have one who has been tempted in every way, just as we are—yet he did not sin. Let us then approach God’s throne of grace with confidence, so that we may receive mercy and find grace to help us in our time of need.”
‭‭Hebrews‬ ‭4:15-16‬ ‭NIV‬‬


Now that we are in this historic period of the Coronavirus, with everything shutting down, and all the medical, economic, emotional, familial, and faith applications of that, here are some elaborations on what each of these promises mean during this time, at least to me.

1. God loves me and cares about me
For I am convinced that neither death nor life, neither social distancing, neither the Coronavirus, nor COVID-19, nor fear, nor isolation, nor sickness, nor the media, nor politics, nor uncertainty, nor anything else in all creation, will be able to separate us from the love of God that is in Christ Jesus our Lord.

2. God will never leave me
To be wise and safe, we are all needing to "leave" each other, at least physically. God has promised that His Holy Spirit to be with us no matter what we are walking through.

3. In this world, I will have trouble, but true peace comes from Him
There is definitely plenty of trouble going on today, on many levels. Trouble is normal, even if this particular kind of trouble, and at this scale, is not normal.
Most of our fear comes from the fear of death. Jesus has conquered death itself!

4. Jesus understands, even when no one else understands
You might be struggling with anxiety or fear. You might have some of the medical symptoms that we are hearing so much about in the news. You might be separated from loved ones by the quarantine requirements. It might feel like no one understands how hard this is.
Jesus understands what it feels like to be alone. He knows what it is like to be tempted to be fearful. He knows what it is like to have physical affliction. He demonstrated compassion for many, many sick people when he walked this earth.
He understands.

I hope this brings a degree of peace and comfort to this very stressful time.


Monday, November 25, 2019

Did anyone "furl" a flag today?

I heard about this piece on NPR recently, and knew it was just the sort of thing I would enjoy. Maybe you would, too. It's called "How I Met My Wife", by Jack Winter. It was published in The New Yorker in July, 1994.

It's full of words that are correctly used with a negative prefix, minus the prefix, like "ruly" instead of "unruly" Some of them require a bit more thought than others to figure out. Some refer to a figure of speech.
I love this because these are just the sort of jokes and observations I find myself making all the time!
Just ask anyone that knows me well. I've been known to make remarks like these (these words taken from the article below):
"Why is it always 'nonchalant'? Does anyone walk about 'chalantly'?" or
"If you fold up a flag, would that be considered 'furling' it?" or
"If you can, in fact, understand something that seems tricky, would you say that you CAN make hide or hair of it?", or finally
"What does 'indefatigable' really mean?
If I can fatigue you, then I can tire you out. You are fatigable.
Then, if I can somehow energize you, then you would be defatigable.
But if this cannot be done (you can NOT be energized after being tired out) then you're indefatigable...which seems to mean the opposite of the actual meaning of the word.

Well, you're probably tired of this, so I'll just let you read the original:


SHOUTS AND MURMURS about man who describes meeting his wife at a party. In his description, he drops many prefixes. It had been a rough day, so when I walked into the party I was very chalant, despite my efforts to appear gruntled and consolate. I was furling my wieldy umbrella for the coat check when I saw her standing alone in a corner. She was a descript person, a woman in a state of total array. Her hair was kempt, her clothing shevelled, and she moved in a gainly way. I wanted desperately to meet her, but I knew I'd have to make bones about it, since I was travelling cognito. Beknownst to me, the hostess, whom I could see both hide and hair of, was very proper, so it would be skin off my nose if anything bad happened. And even though I had only swerving loyalty to her, my manners couldn't be peccable. Only toward and heard-of behavior would do. Fortunately, the embarrassment that my maculate appearance might cause was evitable. There were two ways about it, but the chances that someone as flappable as I would be ept enough to become persona grata or sung hero were slim. I was, after all, something to sneeze at, someone you could easily hold a candle to, someone who usually aroused bridled passion. So I decided not to rush it. But then, all at once, for some apparent reason, she looked in my direction and smiled in a way that I could make heads or tails of. So, after a terminable delay, I acted with mitigated gall and made my way through the ruly crowd with strong givings. Nevertheless, since this was all new hat to me and I had no time to prepare a promptu speech, I was petuous. She responded well, and I was mayed that she considered me a savory char- acter who was up to some good. She told me who she was. "What a perfect nomer," I said, advertently. The conversation became more and more choate, and we spoke at length to much avail. But I was defatigable, so I had to leave at a godly hour. I asked if she wanted to come with me. To my delight, she was committal. We left the party together and have been together ever since. I have given her my love, and she has requited it.

Monday, November 11, 2019

My namesakes

Just in case there is any confusion...

I am NOT this Edward Warkentin, the Canadian Lawyer. I was certainly not born on November 1, 1949 in Niagara Falls, Ontario. He might or might not be the same as this Edward Warkentin.
I'm much younger than that. It sure feels good to talk about how young I am, since I've been having to talk about how old I am, with regard to vision, hearing, running endurance, and such. However, being younger than a 70-year-old isn't saying a lot, I suppose.

I'm also much younger than this Edward Warkentin, who is, in fact, dead!

I am also NOT this Edward  L  Warkentin, who lives in Winnepeg, Manitoba. My phone number is not 204-669-4041.

This Edward Warkentin and this Edward Warkentin can't be found, and I'm not him, either.

Sadly, I make far less than this Edward Warkentin, who may or may not be the same as this Edward Warkentin.

I AM one of these Edward Warkentins on Linked In, though. This one, in fact.

I AM one of these Edward Warkentins on peoplefinders, as well. But no one calls me "Eba"!

If this post seems a little weird...or a lot weird...contact me directly, and I'd be glad to tell you why. It's kind of interesting.

FYI: The URL for this blog (edwardwarkentin.com) used to be https://ededtech.blogspot.com/

Follow me on Twitter: https://twitter.com/senorw and
Facebook: https://www.facebook.com/warkentin.ed

Adult School is cool!

Well, this blog has been dormant for quite a while. God has been doing some very important work in my life. It's time to re-enter the blogosphere, and reflect on life, share my insights and wisdom a bit more publicly.

Here's the nugget of the day:

Student type #1: Students that are forced to be there and don't want to be.
Many K-12 students.

Student type #2: Students that are forced to be there, but enjoy it, want to be there, and take it seriously.
In K-12, these are rare, but not "extinct".

Student type #3: Students that want to be there (learn).
These are the ones that all teachers love to have.
Teaching Adult School is almost exclusively #3.

I spent 24 years teaching K-12. Now, I teach in Alternative Education in Dinuba Unified School District. This means I work at Sierra Vista Continuation High School, Ronald Reagan Independent Study, and Dinuba Adult School. (I like to say that I get to do my favorite things at each of the three schools. More on that in another post.)

The Adult School part of my job is distinct and fulfilling because they always want to be there. The students have personal goals and are ready to maturely pursue them. This makes teaching them a joy.

I'm content where God has placed me. I'm taking opportunities like this to do what my Grandma's favorite verses, Philippians 4:8, and 1 Thessalonians 5:18, advises us - think about good things...things to be thankful for.

FYI: The URL for this blog (edwardwarkentin.com) used to be https://ededtech.blogspot.com/

Follow me on Twitter: https://twitter.com/senorw and
Facebook: https://www.facebook.com/warkentin.ed

Sunday, November 10, 2019

iPad & iPhone Guided Access

Many parents and teachers know the frustration and challenge of getting a student to
1. Stay on the app they've been given permission to use, or
2. Stop using the iPad after the agreed-upon time.

I know this scenario well. At my house, it is difficult to get my boys to stop playing Minecraft, or some other game, and give the iPad back when our kitchen timer goes off.

There is a solution! And it's part of the iPad's operating system already ... no new app to buy!

It's called "Guided Access".

There are many customization options, but here's the way I use it:

1. Go to the app I want to allow my son to use.
2. Triple-click the home button.
3. Hand it over, knowing that it is impossible to use any other app without my passcode.
4. When the amount of time I have chosen expires, my passcode is necessary to do anything.

To use this the first time, I had to go to

  1. Settings, then 
  2. General, then 
  3. Accessibility, then 
  4. Guided Access
Sometimes, it doesn't matter to us whether there's a time limit. Just knowing that they aren't getting into anything they haven't been given permission to use is very helpful.
Most of the time, though, a time limit is the main issue.

I hope this is helpful to you 


FYI: The URL for this blog (edwardwarkentin.com) used to be https://ededtech.blogspot.com/

Sunday, July 31, 2016

Amazing Interviews!

I teach a course through Fresno Pacific University called "ET 735 - Creating on the Web".
In it, I challenge students to create a blog, become active on Twitter, and really invest in creating their Personal/Professional Learning Network (aka PLN). One big assignment is contacting an educator that is much further along that path than they are - a "connected educator".

I really pushed the students to think BIG as far as who they interview. They delivered!

Here are the interviews - these links are to YouTube. They are all embedded on their blogs, also.
Vicki Davis

Jon Corippo

Wednesday, July 13, 2016

Add Gadgets to Blogger

You are at the beginning stages of creating a blog using Blogger.
You know how to write a blog post.

Now it's time to add other content along the sides of your blog. These are called gadgets.

1. Go to Layout.


2. Choose a size for your Sidebar gadget.

They can be different sizes. You may want to choose one that fills the entire margin, or just half of the margin. I have already added some gadgets, which you can see on this blog.


3. Add a Sidebar gadget.
Here are some suggestions for gadgets you might want to add:

•HTML/Javascript - This is great for embedding your Twitter tweets, or any other HTML embed code you might want to put on your blog.

•Profile - Great for letting people know who you are (and show them why you should keep reading your blog).

•Labels - Give them easy access to the labels that you categorize your blog posts with.

•Link List or Blog List - Here is where you show your blog readers what blogs you read. What influences and inspires you? Where can they go for more great content?

•Translate - If your audience is multi-lingual, this one would be great for you.

When you have posted a lot of content, these two would be important to have:
•Search Box - They should be able to search your blog

•Popular Posts - Promote your most popular blog posts


4. Re-arrange your gadgets.


Click and hold on the vertical dots, and drag your gadgets around.


5. Lather-Rinse-Repeat (Revise)
Maybe now you realize that you chose the wrong size for the gadget that you chose. Go back and re-add the gadget with the size you prefer.

Thursday, April 21, 2016

Peer Commenters

I had an epiphany today.

I’ve been commenting like the wind lately, giving feedback on my students’ writing. I’ve been saying academic, but somewhat cryptic things like “cap…”, which means they have a capitalization error. Or “verb tense”, or “proper noun”, etc.

They are finally mature and independent enough that we can do more independent writing time, with more and more feedback given.
Also, several of my students are ready to be peer commenters. They are proficient enough that I would trust their comments (at least enough to risk it at this point).

Today, we came up with a list of comments that I’ve been giving them, others that I could give them, and what they mean. We were also intending for the Peer Commenters to use these same comments.
I knew we had to be structured like this because I wanted to avoid meaningless wastes to time like “this is cool” or “good job” or especially “this duznt mak sens” or even more disrespectful things.
I want the comments to be worth our time, helpful to the original author, and a good example of digital citizenship.

I have extremely high hopes for this structure, and how it will help my students’ writing. I just wish I had been able to start this months ago!

I’m sure these documents will be dynamic, as this becomes more and more a part of how we function as a class…

Here is my list of Peer Commenters:

Here is my Comments Key:

FYI: The URL for this blog (edwardwarkentin.com) used to be https://ededtech.blogspot.com/

Follow me on Twitter: https://twitter.com/senorw and

Facebook: https://www.facebook.com/warkentin.ed

Tuesday, December 29, 2015

Don't Block - Educate!

A student of mine is a teacher in a district that is SO restrictive regarding the online content that is blocked, that she described it this way: 
"Our school denies students (and TEACHERS) from Blogger, YouTube, Google Hangouts, limited Calendar abilities, and even a large portion of images are blocked."

This both broke my heart for her and her students, and angered me. This degree of restriction is both sad, and borderline educational malpractice.


Here is my position, and rationale for a different policy. 


If schools block YouTube, and most images when students are on school property, then they will have absolutely zero practice in how to handle staying on task in the midst of distracting, and even inappropriate, content online.
If we give them no guidance at all in how to navigate the reality they will live in, then they will be unequipped to function in the world once they leave us.

Online content and tools like YouTube, blogs, Google Hangouts, and images exist in the world outside of school.
Yes, there is a lot of garbage available online - from the harmless-but-distracting to the severely troubling. It should concern any adults that are in charge of 
They aren't going away any time soon. The online reality will only get more complex, not simpler.
The need for students to be educated in how to interact appropriately in that environment is not going to fade away - it's only going to increase.

These are simply statements of fact, whether we like it or not. We cannot change these realities.

It would be far better to train them to find appropriate videos and images for educational purposes, to hold them accountable for appropriate online behavior while they are under our authority and supervision. Then, they will be truly ready to function as an educated person in the world that exists outside of school.

On the other hand, I would advocate for a perhaps gradual lifting of restrictions as students progress up the grade levels. For example, my 4th graders don't have access to email, but high school students do. Also, I would suggest that an intermediate stage of change for a school district like this would be to allow teachers access to all of these tools (assuming that they are professional, trustworthy adults, that are perfectly capable of staying on task and appropriate in using the tools unfiltered). There should be no anxiety about teachers demonstrating the use of the tools. If district leadership can't handle going from almost total blocking to nearly zero blocking, they at least take this baby step toward more sane and responsible policies in this area.
Also, I'm not advocating having no blocking of images or websites at all. Some blocking/filtering software is appropriate.

Summary: Don't just block, and pretend that we have solved the problem, and wash our hands of the thorny issue of inappropriate online content.

This rant is officially over. For now. 

Thursday, October 15, 2015

Share a Google MyMap!

If location is important to a lesson or unit you are teaching, I encourage you to use a Google MyMap!

I did this today with California History with my 4th graders. For them to understand the importance of the different regions in California (Coast, Desert, Mountains, and Central Valley), they need to SEE it. We have a few small maps in our Social Studies workbook, but I knew that there had to be a better way...

What better way than to do it:
1. In the context of a shared, interactive map that they can zoom in and out of
2. By seeing actual satellite imagery, showing the different vegetation in each region
3. By placing a marker on the cities that are in each region
4. By coloring the markers to the appropriate, agreed-upon color (blue, red, yellow, and green)
5. By noticing when classmates make errors, and fixing them in real-time

I started with a Google Classroom assignment:
1. Find a city in each of the Regions of CA.(Desert, Mountains, Coast, Valley)2. "Add to Map"3. Change the color of that marker to match this Legend:Desert = redMountains = yellowCoast = blueValley = green4. Edit that marker by clicking on the little pencil icon - Add your name in the little box.
Once you have placed 4 markers, of cities in CA, and colored them appropriately, you may "Mark As Done".
Then I attached the link to the shared "MyMap".


I plan to add a layer to the map where we label the areas where the Native Americans (Native Californians) lived. This will be much more visual, interactive, and "in-context" than previous methods.


I learned what steps were harder for them - what parts of the process I might be slower and more explicit about next time. For example, in the screen shots below, you'll see that they had trouble changing the color of the marker to the appropriate color. This, of course, is a crucial aspect of demonstrating that they've learned about the regions, so I'll work on this more in the coming days. I had a couple students that were ignorant of state borders (that a certain nearby state was not, in fact, in CA). This might not have been corrected without a lesson like this.

Next time, maybe a little video showing each step, and more detail in the assignment itself will make the experience better for all.


Saturday, October 10, 2015

Every Kid In A Park - print free passes using Chromebooks and Classroom

I teach 4th grade, and my students are given the opportunity to sign up to get a free one-year pass to all National Parks. We got pretty excited about this when we had a Park Ranger visit our classroom this week.

I had them do this using their Chromebooks, but we don't have a printer set up to receive those print jobs.
I thought "Hmmm...I should be able to do this with the help of Google Classroom."
It worked!

Students navigated through the https://everykidinapark.gov/ website (steps #1-8),
then at step #9-12 below, created a PDF in their Google Drive.
Step #13-16 helps students choose a file from their Google Drive. That can be tricky for students that have only opened a Drive file directly from Classroom.

The following are the directions I used to guide the students through the process. I hope this is useful to you for this particular goal, or whenever you need to get a PDF created by a Chromebook to your teacher computer to be printed.

----------


Add files to a Google Classroom Assignment to “TURN IN”
“Your Free Pass”


  1. Click the link in this Google Assignment.
  2. Click “GET YOUR PASS”
  3. Click “PLAY” where it says “Fourth graders”
  4. You’ll see “Start your adventure now”. Click the little box that says “Yes…”. Click “PLAY”
  5. In the “Dear Diary” section of this website, explore what you want to learn about the National Parks.
  6. When you see “GET YOUR PASS NOW”, click it.
  7. You’ll see “You did it! Claim your pass”. Enter your zip code. It is 93618.
  8. Click “GET MY PASS”

  1. Click the green button that says “Click this button to PRINT YOUR PASS”
  2. Destination...Save as PDF… Click “Change…”
  3. At the bottom of the next screen, click “Save to Google Drive”.
  4. Click the blue button at the top that says “Save”

  1. In Google Classroom, open the “Your Free Pass” assignment
  2. On the Assignment, click “Add” (it has a little triangle next to it)
  3. Choose Google Drive
  4. Click the PDF that says “Your Free Pass”
  5. Click the blue button at the bottom that says “Add”
  6. You have now attached this file to the assignment, and it’s ready to Turn In.
  7. Click “TURN IN”

  1. Your teacher will print this for you. Take this paper to a National Park, and you will get in FREE for a year!

Thursday, September 17, 2015

Educational Promise of Voice Typing

Google recently made Voice Typing available for schools (Google Apps for Education accounts).

There are several ways that this can be used in with students.
It's not just replacing (Substituting, see SAMR) pencil and paper or even typing.

I believe that there are some substantive, educational benefits to this feature that could really be a game-changer for many students that haven't been reached by other methods or tools. For these students, this could be Augmentation or even Modification.


There's not much to say about how to use it, but for those that may not be familiar, here's how it works:


1. In the Tools menu of Google Docs, you'll now see "Voice Typing".


2. You'll then see a little window on the left with a microphone icon in it. Do as it says: "Click to speak".


3. When you're speaking (and therefore typing), you'll see this red microphone icon.


Now for the educational benefits....

The Speaking and Listening standards in the CCSS can be addressed:
1. The quiet ones
I find that every year, I have several students that struggle with speaking loudly enough to be heard when speaking to the whole room.
2. Those that don't enunciate well enough to be understood
Others don't have a volume problem, but an enunciation problem.

This tool could give both of those kind of students practice working on their speaking.

The Writing standards are now (more) accessible for all students.
Many students have issues that prevent them from participating in anything beyond the earliest stages of the writing process:
3. Those with fine motor skills issues
Holding a pencil, or even typing, is a physical issue that makes the academic thinking of revising, improving, or correcting their written work nearly out of reach.

4. Those with profound difficulty with spelling
They can at least get their ideas out, and think about sentence structure, and deeper tasks such as revising and improving their work.

5. Those with more extensive needs for speech therapy
Depending on the accuracy of this tool, it might even help students realize, "Oh, that's what that sounds like when I say ____". Some students don't realize how they sound unless we record their voice and play it back to them. This tool could certainly play a part of helping those students.

It may now be possible for all students to excel even more with the Writing standards, and the Language standards
6. Those that struggle with focus (ADD-type issues)
Doodling, manipulating the paper, excessive erasing, etc.
I have witnessed how helpful voice typing is when using an iPad with a student with just these issues. Now even more students can access this solution to those struggles.

7. More writing, more thinking, more creating
If writing and typing take significantly less time, then even students without special needs or struggles can write more, think more, and create more, since this tool can speed up a rather mundane, time-consuming part of the process.

The naysayers...
There are certainly those that will respond with things like:
"But in the real world, they're still going to need to type."
"Yeah, but they still need to know how to write with a pencil."
or other similar criticisms.

My response is this:
How long are we going to protect a barrier for these students to do higher order thinking?
What's the point of continuing a prerequisite that prevents students from language-rich conversations about their own word choice, manipulating complex sentences?
Let's let them at least get their ideas out, on the digital page, so they can do some deeper, more critical thinking about their own work!

This is 2015. These types of tools and features are not going to go away. They're going to be more common, not less. They are going to get more and more ubiquitous. We might as well acknowledge that, as we grapple with tools that are just becoming available now.

Sure, they're going to have to use a pencil and a keyboard at some point. Must we wait until these overcome all their barriers before we allow them to learn the other parts of the writing process?

After all, we must prepare them for their future, not our past.


I very much welcome your thoughts. How else can you see this tool benefiting students? How else can we use it in the classroom? Please leave a comment!

Rubik's Cube Instructions in JavaScript

Can Rubik's Cubes fit in Computer Science or Math?  I say YES! Read on to find out why. This past summer, I learned how to solve several...